 Molding & Casting
This
week our assignment was to design a 3D mold, machine it, and cast parts from
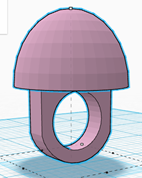
it. I envisioned creating a clear resin ring with a large carpenter bumblebee
nestled inside of my design. I built upon a 3D printed ring I had previously
made in Tinkercad.
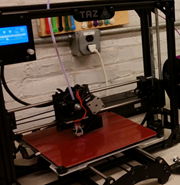 I then 3D printed my ring using
our lab’s Taz printer with blue PLA. Using the ring, I was able to make a silicon
rubber mold. The Oomoo brand was easy to use, and
quick to cure! This mold was very flexible. I also 3D printed two molds.
My experiment with the 3D molds produced a bouncy silicone rubber ring, that
wasn’t perfectly lined up! Then I poured a liquid plastic, Smooth-On, into my
3D printed mold,
I then 3D printed my ring using
our lab’s Taz printer with blue PLA. Using the ring, I was able to make a silicon
rubber mold. The Oomoo brand was easy to use, and
quick to cure! This mold was very flexible. I also 3D printed two molds.
My experiment with the 3D molds produced a bouncy silicone rubber ring, that
wasn’t perfectly lined up! Then I poured a liquid plastic, Smooth-On, into my
3D printed mold,  without
anything to prevent the two plastics from fusing together. The liquid plastic
set & hardened very quickly, within 10 minutes. The container we poured it
from was noticeably hot, also! I decided to go back to Oomoo
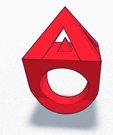
with my ring sliced, and 3D printed in halves(NETFAB
STL file) I used epoxy resin this time and experimentally stuck a bee into the Oomoo mold. This did not produce a very nice effect once the
ring cured a day later. The layers in the plastic diffused the outer part of
the ring, the open air side cured smooth and crystal clear! I will have to sand
my 3D printed ring and start over, this time lining up pegs so
without
anything to prevent the two plastics from fusing together. The liquid plastic
set & hardened very quickly, within 10 minutes. The container we poured it
from was noticeably hot, also! I decided to go back to Oomoo
with my ring sliced, and 3D printed in halves(NETFAB
STL file) I used epoxy resin this time and experimentally stuck a bee into the Oomoo mold. This did not produce a very nice effect once the
ring cured a day later. The layers in the plastic diffused the outer part of
the ring, the open air side cured smooth and crystal clear! I will have to sand
my 3D printed ring and start over, this time lining up pegs so 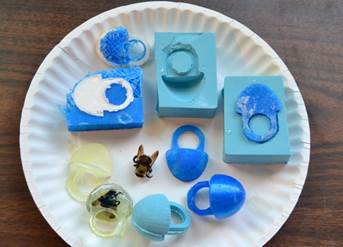 the
two halves will be as seamless as possible!
the
two halves will be as seamless as possible!
Our
fab lab group was fortunate enough to have a friend teach us sand casting at
his forge. In preparation I lasered some 1/8” birch
wood arrows.
The settings I used for our Epilog 50 watt laser to vector cut are 15% speed,
100% power, and 500 Hz. My plan was to create metal arrows I would be able to
hang up and make a wind chime. I learned many things about sand casting. For
one, the sand mixture for the molds contains not just sand, but clay &
motor oil too. You must be very precise making 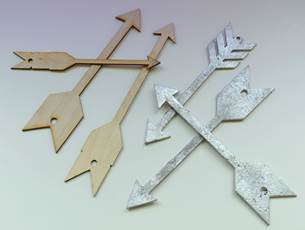 the
hole and bridge that the liquid metal is poured into. The aluminum takes about
an hour to heat up to pouring temperatures. Once the metal has been poured into
the molds, fifteen minutes later you can break it open, carefully pick up the
cast, and cool it off in water. Then, you have to break the bridge of metal
between your two shapes, and grind off any imperfections. My thin, delicate
arrows turned out much better than expected!
the
hole and bridge that the liquid metal is poured into. The aluminum takes about
an hour to heat up to pouring temperatures. Once the metal has been poured into
the molds, fifteen minutes later you can break it open, carefully pick up the
cast, and cool it off in water. Then, you have to break the bridge of metal
between your two shapes, and grind off any imperfections. My thin, delicate
arrows turned out much better than expected!